Kubernetes
Teraslice Kubernetes End-to-End Test Suite and Development Environment
Dependencies
- Docker
- Kubectl v1.34.8
brew install kubectl
- Kind v0.32.0 - Kubernetes in Docker
brew install kind
- Helm v4 - The package manager for Kubernetes
- helm-diff - Helm plugin required by helmfile
helm plugin install https://github.com/databus23/helm-diff
- helmfile v1.2.2 - Deploy Kubernetes Helm Charts
teraslice-cli(akaearl)npm i -g teraslice-cli
Note: Helm and helmfile introduce breaking changes between major/minor versions. If you encounter issues, verify you are using the versions listed above.
Migrating from helm v3 to v4 diff plugin bug
Theres an issue when updating from helm v3 to helm v4 where the diff plugin get corrupted. Delete and reinstall the plugin to ensure things are correct.
General Notes
The ts-scripts package provides a set of tools for working with Teraslice in
Kubernetes. These tools are available via pnpm run or by using the
ts-scripts script directly. It supports the following functionality:
- Running End-to-End Testing
- Launching a Development Kubernetes Environment
- Manages required and optional services. (e.g. Opensearch, Kafka)
A Note on Versioning
ts-scripts will make its best effort to choose the appropriate kind docker image. In a local environment it will use the version of kind it detects on the system and the ts-scripts config K8S_VERSION variable to choose one of the pre-built images listed in the kind release notes. If there is not a pre-built image with the same k8s major.minor version an error will be thrown (patch versions do not have to match). In this case there are two options:
- install a different version of kind. The
KIND_VERSIONlisted in ts-scripts config should always be compatible with theK8S_VERSION. - override the
K8S_VERSIONto one supported by the kind version you have installed. See kind releases.
In CI testing the KIND_VERSION and K8S_VERSION vars are set using the ts-scripts k8s-env --list-versions command, which prints what is in ts-scripts config. This is our single source of truth. These variables will determine which kind and kubectl versions are installed, as well as which kind docker image is cached and used. The kubectl version will be set to equal the K8S_VERSION when setting up kind within the test runner. If one of these versions is overwritten by an env var in a test command then the docker cache will not have the correct image.
Kubernetes End-to-End Tests
The Kubernetes End-to-End tests can be run with the commands shown below. The following things will happen:
- Launch a Kubernetes cluster in your local Docker instance using Kind
- Launch the services required for tests in Kind
- Build a Teraslice Docker image from the current working directory
- Copy image into Kind and run Teraslice master
NOTE: These pnpm commands must be run from the e2e subdirectory:
# change into the e2e subdirectory
cd e2e
# use the default version of nodejs
pnpm test:k8sV2
# test against a specific version of nodejs
NODE_VERSION=18.18.2 pnpm test:k8sV2
# run the tests using an existing dev Teraslice image (handy for working on
# ts-scripts)
pnpm test:k8sV2NoBuild
Some of the Kubernetes End-to-End tests are shared with the standard End-to-End tests.
Kubernetes Development Environment
You can launch Teraslice using Kind in Docker locally and start a Teraslice
job with the following commands (NOTE: earl is an alternative name for the
teraslice-cli).
# build teraslice from local repository and launch teraslice and opensearch
# from the teraslice root directory:
pnpm k8s

# from any other directory:
TEST_OPENSEARCH='true' OPENSEARCH_PORT='9200' pnpm run ts-scripts k8s-env
# launch with a specific OPENSEARCH_VERSION or OPENSEARCH_VERSION; defaults to Opensearch 2.15.0
# from the teraslice root directory:
OPENSEARCH_VERSION='3.0.0' pnpm k8s

# from any other directory:
OPENSEARCH_VERSION=2.15.0 TEST_OPENSEARCH=true OPENSEARCH_PORT=9200 pnpm run ts-scripts k8s-env
If you want to run a specific teraslice docker image, instead of building from your local repository:
# from the teraslice root directory:
pnpm k8s --teraslice-image=terascope/teraslice:v0.91.0-nodev18.18.2

# from any other directory:
TEST_OPENSEARCH=\'true\' OPENSEARCH_PORT=\'9200\' $0 k8s-env --teraslice-image=terascope/teraslice:v0.91.0-nodev18.18.2
If you want to run additional services you must set the appropriate environmental variables. Currently only minio, opensearch and kafka are supported (see issue #3530).
# from the teraslice root directory:
pnpm k8s:kafka

# from any other directory:
TEST_OPENSEARCH=true OPENSEARCH_PORT=9200 TEST_KAFKA=true KAFKA_PORT=9092 ts-scripts k8s-env
After about 5 minutes, Teraslice will be running and listening on port 5678
and opensearch will be running on 9200. You can configure an alias
called local as follows.
earl aliases add local http://localhost:5678
Dev Mode (--dev)
Dev mode enables a faster iteration cycle when actively developing Teraslice itself. Instead of rebuilding and reloading a Docker image on every change, it mounts your local repository directly into the Kind cluster and uses nodemon to watch for file changes and hot-reload.
# from the teraslice root directory:
pnpm k8s --dev

# from any other directory:
TEST_OPENSEARCH=true OPENSEARCH_PORT=9200 pnpm run ts-scripts k8s-env --dev
How It Works
When --dev is passed, two things change:
1. A different Docker image is used (Dockerfile.dev)
Instead of the standard production image, a lightweight image is built that:
- Installs nodemon globally
- On startup, runs
pnpm install --frozen-lockfileinside the container (so native binaries are built for Linux) - Then launches nodemon, watching
src/andpackages/for.ts,.js, and.jsonchanges - On any detected change, runs
pnpm build:force && node service.js
This means the container picks up your source edits without needing a Docker rebuild.
2. Your local repo is mounted into the Kind cluster node
A different Kind config (kindConfigDefaultPortsDev.yaml) is used that bind-mounts the following from your host into the Kind node:
| Host path | Kind node path |
|---|---|
./packages | /packages |
./scripts | /scripts |
./types | /types |
./package.json | /package.json |
./pnpm-lock.yaml | /pnpm-lock.yaml |
./pnpm-workspace.yaml | /pnpm-workspace.yaml |
./tsconfig.json | /tsconfig.json |
./service.js | /service.js |
These are then mounted into the Teraslice pods, so the running container sees your live source files.
Workflow
- Run
pnpm k8s --dev— this builds the dev image and spins up the cluster (~5 min first time) - Edit TypeScript source files in
packages/on your host - nodemon detects the change inside the container, runs
pnpm build:force, and restarts the Teraslice master automatically - Stop and restart any running jobs to pick up the changes (see below)
Note:
pnpm installruns inside the container on startup (not on the host) so that native binaries like the Confluent Kafka client are built for Linux. Subsequent restarts triggered by nodemon skip the install step.
Applying Changes to Running Jobs
nodemon only restarts the master process. Changes to source files are not automatically applied to running execution controller or worker pods. This is intentional — Teraslice's execution controller has its own internal restart tracking that monitors pod restarts and will fail a job if too many unexpected restarts occur. Triggering container-level restarts via nodemon on worker pods would interfere with that logic.
To apply your changes to a running job:
- Make your source code changes
- Wait for nodemon to rebuild and restart the master (watch the master pod logs)
- Stop the job:
earl tjm stop <job-file> - Start the job again:
earl tjm start <job-file>
The new execution controller and worker pods that spin up will use the updated code.
What Triggers a Restart
nodemon watches only for changes inside src/ directories. Changes to package.json files do not trigger a restart.
Known Limitation: Dependency Changes
If you make a change that would modify pnpm-lock.yaml — for example, adding, bumping, or removing a dependency in a package.json — the cluster will break and workers will fail to start. This happens because the lock file mounted into the cluster no longer matches the installed node_modules.
The recommended workaround is to tear down and rebuild from scratch:
kind delete cluster -n k8s-env
pnpm install          # apply the dependency change on the host
pnpm k8s --dev        # redeploy the dev environment
This is an accepted limitation since dependency changes are infrequent and not a typical tight iteration loop.
Launching a Teraslice Job
After setting up a local alias, you can prepare and launch an example
Teraslice job. First you must upload the assets your job will use, for the
sample job we plan to run we will use the elasticsearch-assets and
standard-assets:
# deploy assets needed by job
earl assets deploy local --bundle terascope/elasticsearch-assets
earl assets deploy local --bundle terascope/standard-assets
Now you can register the Teraslice job
earl tjm register local examples/jobs/data_generator.json
Now check to see if the Teraslice job is registered:
curl localhost:5678/txt/jobs

job_id                                name            active  lifecycle   slicers  workers  _created                  _updated
------------------------------------  --------------  ------  ----------  -------  -------  ------------------------  ------------------------
e4e2169d-6d66-4cfc-b4c3-f9cb8511cd8d  Data Generator  N/A     persistent  N/A      1        2023-12-05T23:31:58.417Z  2023-12-05T23:31:58.417Z
Now we can start the Teraslice job:
# start test job
earl tjm start examples/jobs/data_generator.json
And check to see if there's a new Execution:
curl localhost:5678/txt/ex

name            lifecycle   slicers  workers  _status  ex_id                                 job_id                                _created                  _updated
--------------  ----------  -------  -------  -------  ------------------------------------  ------------------------------------  ------------------------  ------------------------
Data Generator  persistent  1        1        running  3c04f3b6-8430-478b-835e-b085110eec94  e4e2169d-6d66-4cfc-b4c3-f9cb8511cd8d  2023-12-05T23:36:12.852Z  2023-12-05T23:36:35.242Z
Inspecting the Kubernetes Resources
First off, there are two primary tools for interacting with Kubernetes and Kind:
kubectl- interacting with Kubernetes on the command linekind- manages the KIND Kubernetes cluster
Both of these need to be installed for anything to work.
When we launched the cluster, we create two Kubernetes Namespaces, which you can see below:
kubectl get namespaces | grep dev1
services-dev1        Active   12m
ts-dev1              Active   5m12s
these namespaces have the following roles:
services-dev1- supporting services like Opensearch or Kafka run herets-dev1- The teraslice Master and job components will run in here
You can see the Opensearch Kubernetes Pod and associated resources like this, other supporting services would appear here too if they were running. In the example below we see there is only an Opensearch Pod:
kubectl -n services-dev1 get all

NAME                                 READY   STATUS    RESTARTS   AGE
pod/opensearch-56b7b58bc8-rttf9   1/1     Running   0          23h

NAME                    TYPE       CLUSTER-IP     EXTERNAL-IP   PORT(S)          AGE
service/opensearch   NodePort   10.96.85.233   <none>        9200:30200/TCP   23h

NAME                            READY   UP-TO-DATE   AVAILABLE   AGE
deployment.apps/opensearch   1/1     1            1           23h

NAME                                       DESIRED   CURRENT   READY   AGE
replicaset.apps/opensearch-56b7b58bc8   1         1         1       23h
You can see the Teraslice master and any running job related resources like this:
kubectl -n ts-dev1 get all

NAME                                                       READY   STATUS    RESTARTS   AGE
pod/teraslice-master-84d4c87c7b-rz85x                      1/1     Running   0          23h
pod/ts-exc-data-generator-e4e2169d-6d66-cpk5c              1/1     Running   0          9m54s
pod/ts-wkr-data-generator-e4e2169d-6d66-775544794b-vlq65   1/1     Running   0          9m52s

NAME                       TYPE       CLUSTER-IP      EXTERNAL-IP   PORT(S)          AGE
service/teraslice-master   NodePort   10.96.191.171   <none>        5678:30678/TCP   23h

NAME                                                  READY   UP-TO-DATE   AVAILABLE   AGE
deployment.apps/teraslice-master                      1/1     1            1           23h
deployment.apps/ts-wkr-data-generator-e4e2169d-6d66   1/1     1            1           9m52s

NAME                                                             DESIRED   CURRENT   READY   AGE
replicaset.apps/teraslice-master-84d4c87c7b                      1         1         1       23h
replicaset.apps/ts-wkr-data-generator-e4e2169d-6d66-775544794b   1         1         1       9m52s

NAME                                            COMPLETIONS   DURATION   AGE
job.batch/ts-exc-data-generator-e4e2169d-6d66   0/1           9m54s      9m54s
One important fact about Teraslice jobs running in Kubernetes is that the
Kubernetes resources that are part of a job all have a set of Kubernetes Labels
attached to them. For instance all of the resources for the Teraslice Job with
jobId: e4e2169d-6d66-4cfc-b4c3-f9cb8511cd8d can be viewed with kubectl by
adding the label selector -l and supplying the right key value pair for the
label as shown below using the jobId above
kubectl -n ts-dev1 get all -l teraslice.terascope.io/jobId=e4e2169d-6d66-4cfc-b4c3-f9cb8511cd8d
However, in most instances, we use the exId: 3c04f3b6-8430-478b-835e-b085110eec94
to interact with a Teraslice job, since it is more specific. For example,
showing all of the resources related to the exId above with the following
command:
kubectl -n ts-dev1 get all -l teraslice.terascope.io/exId=3c04f3b6-8430-478b-835e-b085110eec94
results in the following output:
NAME                                                       READY   STATUS    RESTARTS   AGE
pod/ts-exc-data-generator-e4e2169d-6d66-cpk5c              1/1     Running   0          23m
pod/ts-wkr-data-generator-e4e2169d-6d66-775544794b-vlq65   1/1     Running   0          23m

NAME                                                  READY   UP-TO-DATE   AVAILABLE   AGE
deployment.apps/ts-wkr-data-generator-e4e2169d-6d66   1/1     1            1           23m

NAME                                                             DESIRED   CURRENT   READY   AGE
replicaset.apps/ts-wkr-data-generator-e4e2169d-6d66-775544794b   1         1         1       23m

NAME                                            COMPLETIONS   DURATION   AGE
job.batch/ts-exc-data-generator-e4e2169d-6d66   0/1           23m        23m
In Kubernetes, the resource that actually references the running containers is called a Pod, you can view the log output from that container with the following command, you just have to specify the name of the pod you're interested in. For example to get and follow the logs for the Teraslice worker listed above you would run the following command:
kubectl -n ts-dev1 logs -f ts-wkr-data-generator-e4e2169d-6d66-775544794b-vlq65 | bunyan
You can look at the master pod logs with this command:
kubectl -n ts-dev1 logs -f teraslice-master-84d4c87c7b-rz85x | bunyan
You could delete the Teraslice worker pod with the following command:
kubectl -n ts-dev1 delete pod  ts-wkr-data-generator-e4e2169d-6d66-775544794b-vlq65
pod "ts-wkr-data-generator-e4e2169d-6d66-775544794b-vlq65" deleted
Note that in this particular case, that pod will automatically be recreated by
it's parent ReplicaSet. In most cases, you should use the Teraslice API to
interact with the Teraslice job and only fall back to directly using kubectl
when problems arise.
When you're done, don't forget to stop the Teraslice job:
# stop the test job
earl tjm stop examples/jobs/data_generator.json
Cleanup or Rebuild
When you're done and want to clean everything up, you can delete it all with a single Kind command and reset the modified job file as follows:
kind delete cluster -n k8s-env
git checkout examples/jobs/data_generator.json
If you are iterating on development changes to Teraslice itself and need to rebuild and redeploy the Teraslice master, you can use the following command:
NOTE: this does not reset state in the opensearch store
# from the teraslice root directory:
pnpm k8s:rebuild

# from any other directory:
pnpm run ts-scripts k8s-env --rebuild
If you would like to reset the opensearch store at the same time:
# from the teraslice root directory:
pnpm k8s:rebuild --reset-store

# from any other directory:
pnpm run ts-scripts k8s-env --rebuild --reset-store
If you need to restart Teraslice without rebuilding you can use the following command:
NOTE: this does not reset state in the opensearch store
# from the teraslice root directory:
pnpm k8s:restart

# from any other directory:
pnpm run ts-scripts k8s-env --rebuild --skip-build
If you would like to reset the opensearch store at the same time:
# from the teraslice root directory:
pnpm k8s:restart --reset-store

# from any other directory:
pnpm run ts-scripts k8s-env --rebuild --skip-build --reset-store
Extras
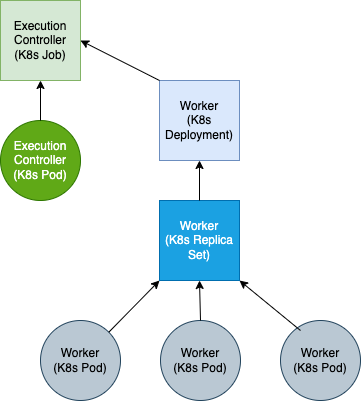
Teraslice Kubernetes Job Structure
A Teraslice job in Kubernetes is comprised of the following Kubernetes resources: